|
Removal and Replacement Instructions
(steps 41-50 of 60)
- Re-connect ground wire to left fuel rail stud.
- Re-connect left-side (green) temperature sensor connector.
- Re-connect front (2) right (driver) side fuel injector connectors. Re-install the small, rectangular fuel injector
connector gaskets as necessary.
- Re-connect right-side (gray) temperature sensor connector and re-connect wiring loom mount to front intake manifold stud (if so equipped - see NOTE on step 15).
- Re-connect (2) rear, right-side fuel injector connectors. Re-install the small, rectangular fuel injector
connector gaskets as necessary.
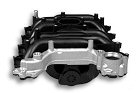
- Re-install throttle body using (5) 8mm bolts. I attempted to clean the throttle body before re-installing it My factory throttle body had a sticker on it cautioning against cleaning due to a "special coating" inside the throttle body. I wiped off all the carbon I could (with a paper shop towel) and blew some compressed air through it. NOTE: See CAUTION following step 48. You may want to pre-tap these holes before installing the throttle body in case one breaks and you need to get at the remains using Vise Grips while questioning the heritage of the person who chose to cut corners on this part of the design.
- Re-connect EGR tube/line (large tube with coupling type connector) using an adjustable wrench. If you used the
alternate method of disconnecting the EGR unit by removing the (2) 10 mm bolts that secure the EGR to the throttle
body, re-connect the EGR unit by re-installing the (2) 10mm mouting screws (replace the EGR gasket if necessary).
- Re-install rear throttle cable bracket using self-taping screws provided in the new intake kit. Re-attach throttle cables to clips on bracket.
CAUTION: This is the only "flaw" we found in the new manifold design. Instead of using
threaded, metal bosses (like all the other manifold mounting points) this bracket mounts using plain plastic "holes"
and self-taping screws. These screws are cheap and will break-off inside the manifold bosses (we speak from
experience). We suggest using WD-40 on the screws and pre-taping the holes using one set of screws and using
additional screws to mount the bracket (in case the taping screws were stressed during the taping process).
The kit included far more screws than needed for the install (at least more than we needed for our 1997 Grand
Marquis). These additional screws are for '98+ models which use a Coil-On-Plug (COPS) ignition system. The screws are
used to mount the individual coils.
- Re-connect (3) vacuum lines to rear of throttle body.
- Re-connect throttle position sensor (TPS) and idle air control (IAC) connectors and re-attach wire loom anchor.
|
.jpg)

